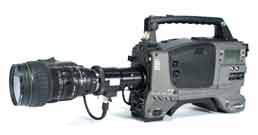
Operating Instructions for AstroScope 9323B 2/3" B4 ENG Night Vision Module | Night Vision
Product Description
The AstroScope 9323B is a delicate electro-optical device - handle it with care!
Please review these important instructions before operating the AstroScope 9323B. If further assistance is required, please contact our office.
HANDLING PRECAUTIONS AND NOTES ON USE
Please note that although the AstroScope is a rugged device, it should be treated as a finely adjusted precision instrument. To be assured of trouble‑free operation & full performance capabilities, we strongly recommend that the user check these instructions completely before attempting to assemble and operate.
- Do not store the AstroScope in temperatures lower than ‑30°C as this may cause the intensifier tube to crack.
- Do not point the Module directly at the sun or any other very bright object whether the power is on or off as this may damage the image intensifier - damage of this kind is not covered by insurance and damage will be charged back to the hirer. When viewing very bright objects, always ensure that the camera's iris diaphragm is either closed or very small (or the lens cap is on).
- To avoid damage to the image intensifier, do not view bright point sources of light (such as headlights or street lamps) for extended periods of time.
- As the daytime performance of your camera is better without the unit, do not use the AstroScope unnecessarily during the day when it is not required.
- Do not touch the glass front or back areas as this will degrade the imaging performance. Should cleaning be required, carefully clean both front and back optical surfaces using soft lens paper and lens cleaner or alcohol (see pictures below).
 - -----
- As the AstroScope is a solid‑state, modular unit utilising mainly low‑voltage circuitry at non‑hazardous energy levels, high power supply voltages are present on certain parts of the interior. DO NOT DISMANTLE THE UNIT - damage caused to dismantling of the unit is not covered by insurance and will be charged back to the hirer.
- Keep the AstroScope away from direct heat sources, high‑powered light, and strong magnetic fields. Excessive moisture, gas, or salt‑laden atmospheres should be avoided for extended periods of time as internal circuit components and connector contacts may be adversely affected.
Introduction:
The AstroScope 9323B is the ultimate Night Vision Module for use with 2/3" Bayonet‑mount Cameras (having a B-4 type mount). Designed for dedicated use on these removable‑lens cameras, the AstroScope offers both surveillance and ENG operators the absolute highest possible performance available for this configuration.
Due to the use of a state‑of‑the‑art Generation 3 high performance image intensifier, the AstroScope is able to transform dark, moonlit, or starlit nights (as low as 10‑6 lux) into bright, high resolution scenes easily recorded by the camera. Due to its compact and lightweight design, the AstroScope is ideal for any imaging scenario, portable or tripod mounted.
It is important to note that the AstroScope responds to invisible near infrared light as well as visible light. Consequently, reflectance of near infrared light is also important.
The AstroScope incorporates the following important features:
* Light amplifier and relay lens assembly in one rugged housing;
* Attaches to B-4 type lens mount. Uses wired lens connection for power and objective lens control;
* Accepts B-4 type Objective Lenses with full motor control of zoom and iris;
* Does not incorporate batteries;
* Utilises a state‑of‑the‑art intensifier.
It is recommended that the user study the information contained in Operating Instructions. If there are any questions that remain unanswered by the manual, please feel free to contact our office for assistance.
Method of Set-Up and Operation:
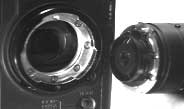
To attach the AstroScope to the 2/3" bayonet mount camera, simply:
- Disconnect the lens connection cable from the camera.
- Remove the objective lens from the camera lens mount.
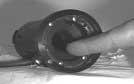
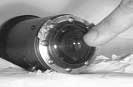
- Attach the AstroScope to the camera lens mount by properly positioning the module's alignment pin and securing the camera's lens capture ring (see picture below).
- Similarly, the objective lens is attached to the front of the 9323B module and secured.
- Attach the 9323B's connection cable to the camera's lens connector.
- Attach the lens connection cable to the receptacle on the AstroScope.
Procedure for camera set-up and power:
- Set the objective lens to the manual iris mode.
- Adjust the iris to the "C" (closed) setting. This is the recommended position when the camera is not in use and the lens cap has been removed.
- Rotate the filter wheel so that no filters are in the optical path (if possible). Alternately, rotate the filter wheel to remove neutral density filters.
- Set camera gain to 0 dB.
- Set colour balance to the "preset" setting (3200 °K).
- Connect power and turn camera on. Lens and AstroScope are both powered by the camera.
- In a low-light setting, open the lens iris slightly and assure that an image is visible from the viewfinder monitor (which may be out of focus). Close the iris.
Note that the AstroScope has its own back focus adjustment to ensure crisp focus with every camera. This adjustment is located on the left side of the AstroScope module and is a 90°slide control with a locking screw. With the camera power initiated, the procedure below is suggested.
Procedure for camera focusing:
- Select an object for focusing. Flat objects at a few feet or scenes at a long distance (> 30 ') are preferable. Assure that the scene illumination is relatively low (room light or dimmer). Lamps or light sources should not be included in the field of view during this focusing procedure.
- Set the objective lens to the widest possible zoom position.
- Set the lens focus ring to the distance appropriate for the object or scene being viewed.
- Open the lens iris slightly until an image is visible in the viewfinder. A small aperture is important in maintaining a large depth of field for the objective lens.
- Move the AstroScope's back focus slide adjustment until the best focus is achieved.
- Open the objective lens iris to its widest opening in order to obtain the smallest possible depth of field. Then adjust the objective lens' back flange focus until the best focus is achieved.
- Zoom the objective lens to the telephoto position and refocus. Then set the lens again to the wide angle position to assure parfocality.
Composition:
Now compose the subject as usual and record in absolutely the lowest light levels ever! It is recommended that for superior performance, the highest quality low F-number objective lenses be used. Since the 9323B incorporates 2/3" lens mount technology, full motorized control of zoom and iris are permitted. In auto-iris mode, the AstroScope will automatically close the iris setting when high brightness scenes are viewed. However, it is always a good idea to be aware of the scene brightness and iris position so that the maximum brightness is not exceeded.
The night vision scenes recorded will be a monochrome green. For ultra-low light scenes for which covert (undetected) imaging is required, a bore-sighted infrared light source (see Fig. 4.5) is available as an option that illuminates the dark areas covertly by emitting an invisible light beam. (The AstroScope then converts this infrared light to visible so that it can be viewed by the camera).
Export restrictions & controls:
As the AstroScope 9323B utilises state‑of‑the‑art technology, it is unlawful and prohibited to carry or export this device out of Australia without approval from the U.S. Department of Commerce, the Australian Department of Defence - International Materiel Branch Export and International Programs & Military & Law Enforcement Technologies!
![]()